Due to the coming GDPR regulation in May 2018 many customers are working very actively towards this date and check their compliance and security environment. Many requests arise around Azure Information protection which gives customers the ability to classify and protect their data in an easy, reproducible way. Data classification helps users to differentiate between data that can be shared outside an organization and data that is classified or NDA information. Many statistics show that less than 5% of all data from an organization are in that high classification range.
Azure Information protection helps you classify and protect that type of data. One of the main questions here is: how is that handled with external or guest users? What is the user experience for an external user and how can he open those protected messages (Mails or Documents). The user experience is demonstrated below.
First of all there is a difference between internal users, external users with public E-Mail addresses like Gmail, Yahoo or outlook.com and those external users with Enterprise email addresses. External users with Enterprise email addresses are separated in two groups: one with an Azure Active Directory and one without one. This article describes the user experience for any group of external users and shows how the onboarding process looks like for external users without an Azure active directory.
Setup Azure Information Protection (AIP)
If you already setup Azure Information Protection, you are good to go. Azure Information protection is configured through portal.azure.com. If you are on Office 365 you need to enable it here as well. After you enabled it in Office 365 you should also configure the Exchange Online settings to get the full experience to work, configure the protect button in your environment. This is done with a simple PowerShell, described here.
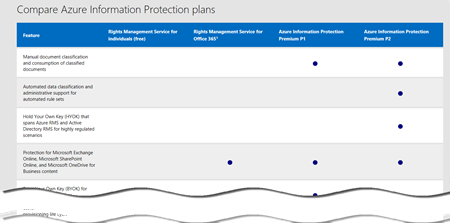
In the Admin portal go to Settings / Services & add-ins and select Azure Information protection. Click on “manage Azure information protection settings” and activate it. For advanced features click on “advanced features” and you will land in the Azure portal. Be aware what license type you have, with AIP P1 you get the classification and protection settings. This portion usually comes with Enterprise Mobility and security suite E3 or Microsoft 365 E3. To see the differences around the license options look here:
Pro Tip: be aware that you should plan Azure Information Protection properly and define a classification policy in your organization which is simple and easy to understand. Start small and smart and don’t overclassify! A very good approach in the beginning is to start with a basic classification which follows the – well known – traffic light colors. Green, yellow and Red are colors many users know and interpret correctly, so with that you are normally good to go. For AIP to be introduced properly use a good user documentation and user awareness training and communications. The better users understand why the solution is available the easier is the ongoing usage of that!
User experience for internal users
The user experience for internal users is quite simple: it just works. AIP is configured and the user sees the message he received. No more effort necessary.
User experience for external users with a Gmail or Outlook.com Address
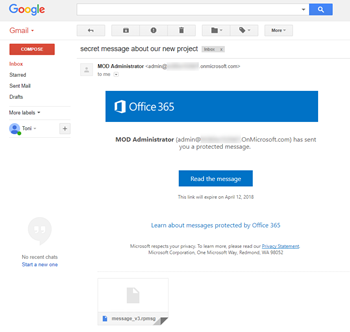
External users, who have a gmail, Yahoo or outlook.com address can verify themselves when they receive a protected message with their account credentials or a one-time passcode.
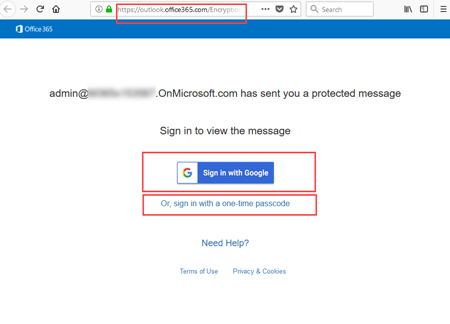
As soon as the external user clicks on the message he can either sing in with his Gmail credentials or request a one-time passcode which is send in a separate email.
The important part here is: the message never leaves the Office 365 environment as you can see with in the address bar of the browser. So the external user connects to Office 365 and reads the encrypted message from there.
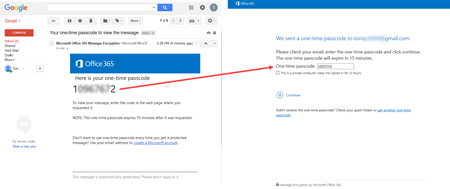
In my example, the user requests a one-time passcode:
After the user confirms that, he can sign in.
What happens when a user has a less popular email account: in that case he can still use a Microsoft account (or needs to sign up for one) or the one-time passcode.
User experience for external users with an Azure Active Directory (Office 365 accounts)
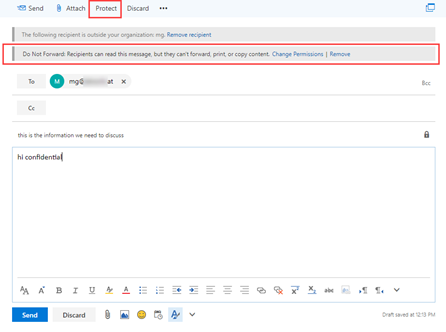
With external users who also have an Azure Active Directory account the message triggers the AIP configuration. So first, our admin sends a message to an external user:
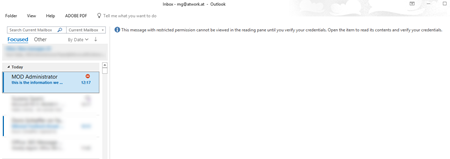
As soon as the user receives the message, he needs to verify his credentials in Outlook:
and after verification you get access to the message In the reading pane.
The very nice part about the “view only” permissions here is that the recipient is unable to make screenshots of the message, as the screen turns black in the protected message area. This might also be confusing if people are not aware that this type of permission is very restrictive. In cases where you need to work with customers on selected messages its better to select another permission and encryption type.
User experience for external users without an Azure Active Directory
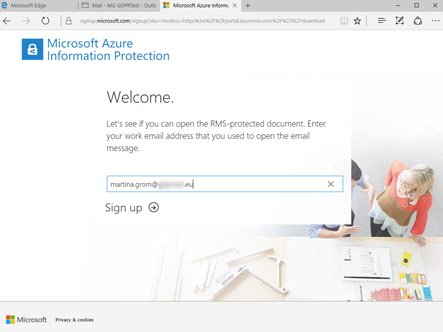
If you share documents with users, who have a corporate Domain which was never registered with Azure Active Directory there is another option available: RMS for individuals. In that case the user has the possibility to self-service sign-up for RMS on this website:
The website checks if the domain is already known in Azure active directory. If not the user has to register himself. If the domain is unknown the user gets a one-time registration code and after that he can setup the account.
From a user perspective, this is a very convenient way to sign-up to the service. From an administrator perspective you are faced with an orphaned Azure active directory which you need to process through additional steps (described below). The other topic here what might be less-optimal is the country selection: as soon as the user selects a country, the aad is setup in that region which might be problematic for future projects where multi-national companies want their tenants in their main operating region.
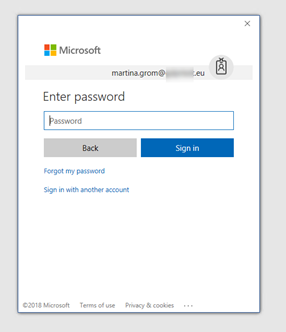
As soon as the user finalized self-service sign up he is able to view the message after he authenticated himself.
Pro Tip: try to work with your users and let them understand how external sharing works.
The self-service sign-up process is described by Microsoft as well, some of the steps don’t happen in that way but in principal it works.
How to retrieve an orphaned domain as an administrator
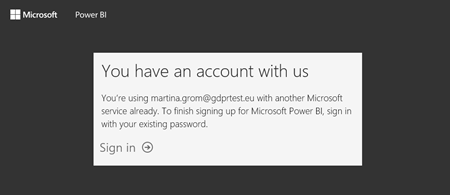
As I mentioned above self-service sign-up is extremely beneficial for users, but administrators might be confused where their domain is now. The procedure is the same like it is with the PowerBI self-service sign up. Luckily an administrator can get back control to his domain.
The first account that signs up in Azure active directory is created a a standard user, not a global administrator. This is very clear as you need to prove that you own the domain you are signing in and adding to Azure active directory. If more users from the same domain sign up through that process they can now easily use RMS for individuals and those users can also collaborate with each other.
From an IT department perspective you can choose: leave it as self-service or get back control on this added domain and Azure Active Directory. The preferred way will be getting in control of that and manage the identities like the administrators do for their on-premises systems. Be aware that with that step you are NOT converting the subscription type from a free subscription to a paid one (of course you can do that, too).
So, to take over an unmanaged directory (shadow tenant) as administrator you have to follow those steps, the same process that I already described in this blog article:
A user with "@contoso.com" needs sign-up in http://www.powerbi.com/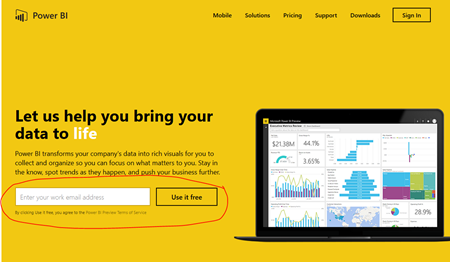
Once you sign up, your account will be provisioned in the tenant.
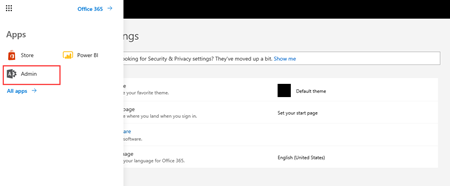
Now go to https://portal.office.com and signup with "@contoso.com" account. You are now signed in and get the admin option in the app launcher:
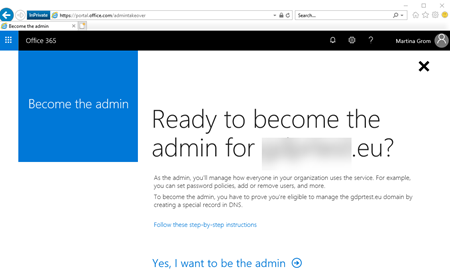
As soon as you cklick on Admin you will be redirected to the https://portal.office.com/admintakeover and can start the admin takeover process.
Follow through the process of becoming an admin (you will asked to verify that you own the domain with the TXT record). So, add the TX record and verify your domain. As soon as you have done this the account will be granted global administrator rights and you are able to look at the self-service users and manage them.
Conclusion and drawbacks
Azure Information Protection is a great way for Data protection and classification. The best user experience is the one when anything is prepared upfront, policies are setup correct and users are informed and well trained. Even with external users the experience is a good one as long as the external user has a public email account or signs up for one or the external user already has an AIP license. The self-service sign in process for those users who are not in Azure active directory is also a smooth one.
During testing this scenario I found some topics which can create confusion and frustration for external users and their administrators:
- Self-service sign up process may lead to many unwanted scenarios, like that the user signs up for an MSA account with his enterprise domain. This occurs as soon as the user f.i. tries to open a protected document in word.
- Self-service sign up may lead to unwanted tenant names and locations.
- Domain takeover needs a PowerBI sign-up? really?
- Domain takeover need some work to do for an administrator and afterwards he might disable the option for AIP.
- The process is more complex is on premises services are used
- The documentation for this process is really fragmented and needs some experience.
Further reference
- RMS for individuals and Azure Information Protection
- How users sign up for RMS for individuals
- How administrators can control the accounts created for RMS for individuals
- Frequently asked questions for Azure Information Protection
- Frequently asked questions about data protection in Azure Information Protection
- What is self-service signup for Azure Active Directory?
- How to find out if your users have signed up for RMS for individuals
- Take over an unmanaged directory as administrator in Azure Active Directory
All in all I like AIP a lot and I think it is very helpful in protecting documents. I hope some of the hickups users get currently will be removed soon. In our current projects we address those topics very early to avoid any confusion.
Categories: Cloud, Azure, Office365, Microsoft365, Security, AIP, Azure Information Protection
Source: https://blog.atwork.at/post/Azure-information-protection-user-experience-with-external-users
