Governance Toolkit 365 (GT365) provides insights and automation solutions for Microsoft 365. To use these capabilities, the GT365 application must be approved by a Microsoft 365 administrator. As new solutions and features are continuously added, additional permissions may be required over time. This guide explains how administrators can grant and renew the required permissions.
GT365 uses the Governance Toolkit 365 application to securely read data from your Microsoft 365 tenant and provide insights, reports, and automation capabilities. Once the application has been approved, administrators can optionally enable additional services and features through the permissions described below.
Setup
Prerequisite: The following steps can only be performed after GT365 has been requested, provisioned for your organization, and activated.
Administrators can perform the following actions:
- Grant Application Permissions (Required)
- Create a Power Platform Service Account (Optional)
- Grant Power Platform Permissions (Optional)
- Grant Power BI Permissions (Optional)
- Configure Solutions and the GT365 API (Optional)
Please perform the following steps while signed in as a Global Administrator of your Microsoft 365 tenant. Use a browser in InPrivate/Incognito mode and select “No” when prompted with “Stay signed in?”.
Optional: Steps 2-5 are only required to collect data from the corresponding services. Skip any steps for services that are not required in your environment.
Step 1 - Grant Application Permissions (required)
These steps must be performed as a Global Administrator. You can use Privileged Identity Management (PIM). Perform these steps after registration.
Note: Since we are constantly adding new solutions, it may be necessary to repeat this process after some time to use new features or if existing features do not work properly.
Here’s how it works:
- Open a browser in In-Private mode.
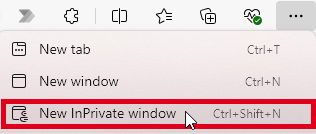
- Open the URL GT365 App consent.
- Sign-In with your Global Administrator account: Enter Username and password, and confirm the MFA / Passkey request.
- Confirm the app permissions request for the Governance Toolkit 365 app with Accept.
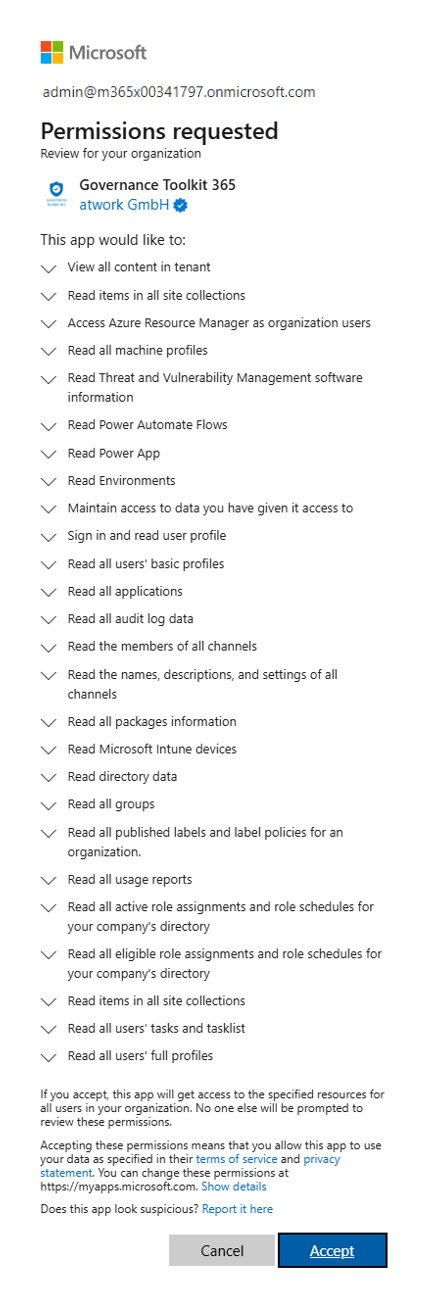
GT365 follows the principle of least privilege. All permissions are read-only. However, due to the large number of functions, the list of required permissions is relatively long. The trust principle applies. This confirmation only needs to be done once. - The website informs about the success. Continue with step 2.
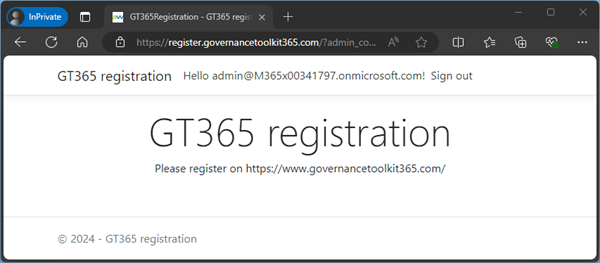



This grants the GT365 application permission to read data from your Microsoft 365 tenant. If additional permissions are required for new GT365 features, renew your consent using the URL above. You can re-grant consent or remove the GT365 service principal from your Azure portal at any time.
Step 2 - Create a Power Platform Service Account (Optional)
GT365 reads information from various Microsoft application interfaces. For getting access to the Power Platform, an administrator needs create a service account (this step) and to confirm the link (step 3).
Note: If you already have a Power Platform service account, you can skip this step and continue with Step 3. Existing service accounts used for the CoE or other Power Platform solutions can also be used for GT365, provided they meet the required permissions. There is no need to create a separate service account.
If you do not already have a suitable service account, follow the steps below to create one in the Azure portal.
- Use the browser you used to sign-in as a global administrator in step 1 (or sign-in again in a In-Private browser with a Global Admin).
- Open the Azure portal and navigate to Microsoft Entra ID / Manage / Users: Users - Microsoft Azure
- Click on New user and Create new user.
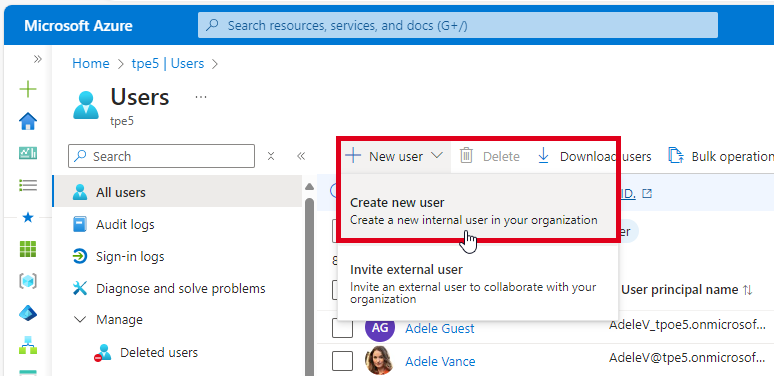
- Enter a name for the service account. Give the service account a name. Here we use service.gt365 and any domain. You can use any username and password. Then, click on Review + create.
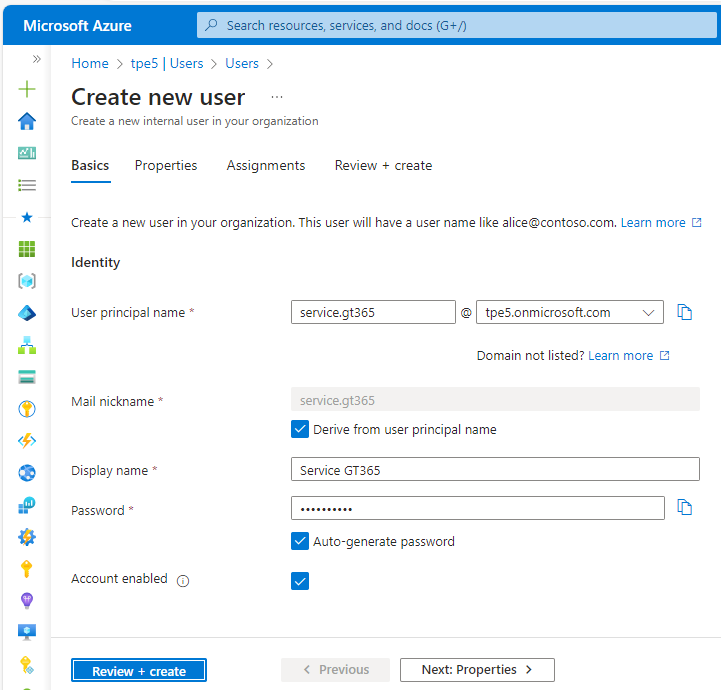
- Confirm the user creation with the Create button.
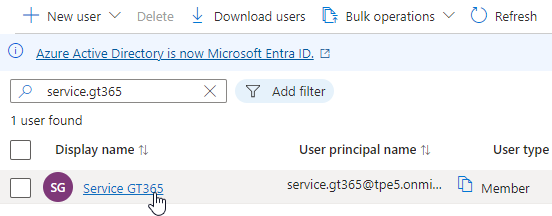
- When the user list is shown, search for the new user service.gt365 an open the user account.
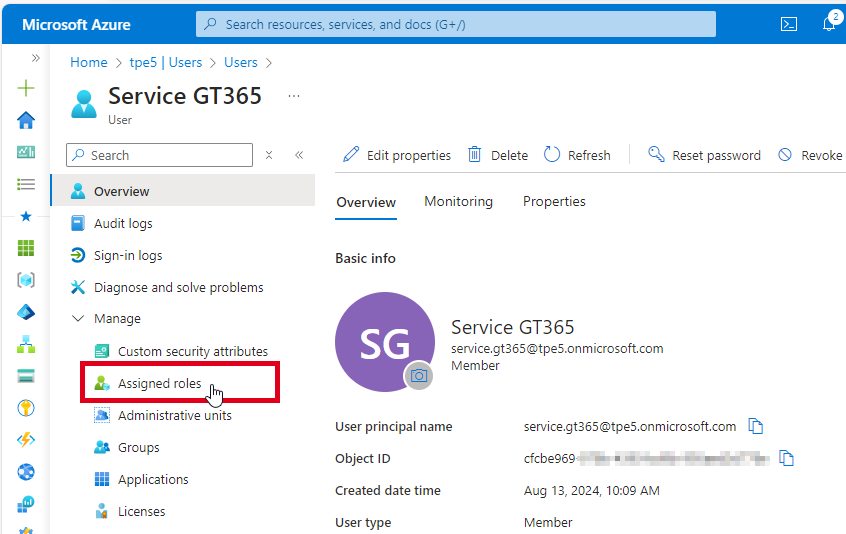
- In the user account Manage menu, click on Assigned roles.
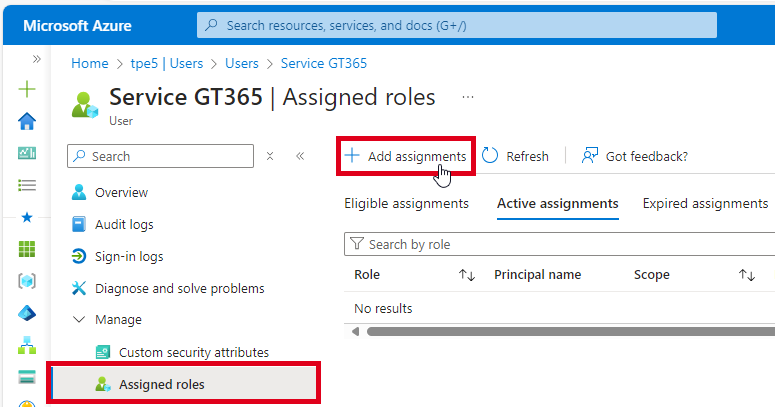
- We need to add the Power Platform role to this account. Click on Add assignments.
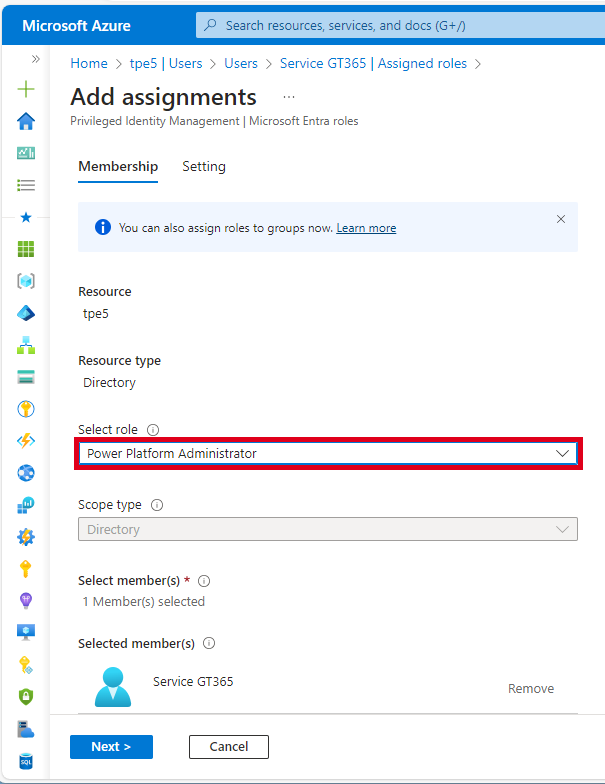
- In the Select role dropdown, select the “Power Platform Administrator” role as here. Click on Next.
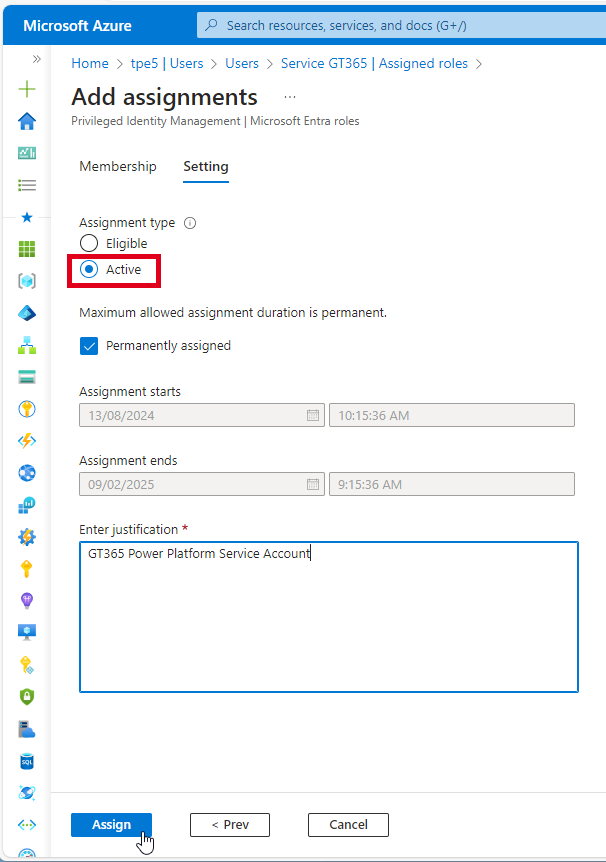
- Change the Assignment type to Active, ensure that [x] Permanently assigned is checked, and enter a justification for this role, such as “GT365 Power Platform Service Account”. Then, click on Assign.
Note: The Power Platform service requires the service account to have a permanent role. At this time, the service cannot operate without an active role assignment. - Azure confirms the role assignment with a notification message. In the Assigned roles list, click on Refresh to see the Active assignments, as here.

This confirms that the service account has a permanent active role assignment, which is required to collect Power Platform data. - Close the browser.
- Sign-in with the new service account in a new In-Private browser session. Open any M365 URL or https://portal.office.com.
- Ensure that you have a valid password and MFA set for the new service account (to use it as described in step 3). Follow the sign-in process for the new account.
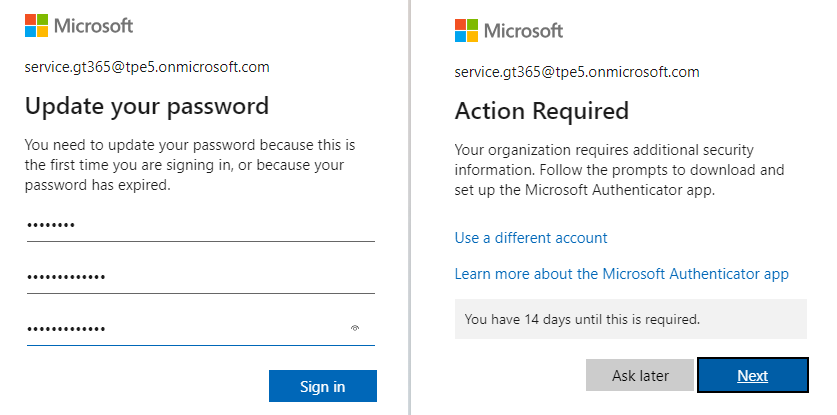
- When the “Stay signed in?” prompt follows, ensure to click on “No”!
- The service account creation has been done. Make a note of the access data for the service account. Continue with step 3.









Step 3 - Grant Power Platform Permissions (Optional)
Once the service account has a permanent Power Platform Administrator role assignment, the necessary permissions must be granted. Complete the following steps while signed in as the service.gt365 account.
Note: You can also follow these steps if you notice that data is missing in the Power Platform in GT365 to renew these permissions.
- Open a browser in In-Private mode.
- Open the URL GT365 Power Apps consent.
- Sign-In with your service.gt365 account: Enter Username and password, and confirm the MFA request.
- When the Stay signed in? prompt follows, click on No.
- This is followed by a confirmation page. This enables access to the Microsoft Power Platform.
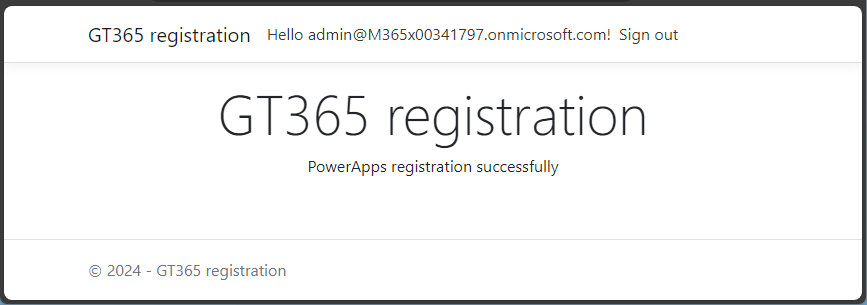
- This completes the Power Platform regsitration process and the browser can be closed.


Step 4 - Grant Power BI Permissions (Optional)
Note: This process was updated in 2025. For details, see Important Update for Governance Toolkit 365 Users Configuration Changes Required for Power BI Integration.
- Open a browser in In-Private mode (or use the browser you used to log in as a global administrator in step 1).
- Create a new Security Group (or use an existing security group): Open the Azure portal, and navigate to Entra ID, or follow this link: Microsoft Azure - Groups.
- Create a new security group: Click on the Add icon, and select Group. In this sample, we name the security group “GT365-PowerBI-Admins”.
- Add a member: Click on the link No members selected. In the panel Add members, select the tab Enterprise applications, and search for the “Governance Toolkit 365” app, as shown below.
- Select the GT365 app: Select the “Governance Toolkit 365” app with Id “f6108159-1168-475d-b3ca-be8104781bf8”, and click Select, as shown here.
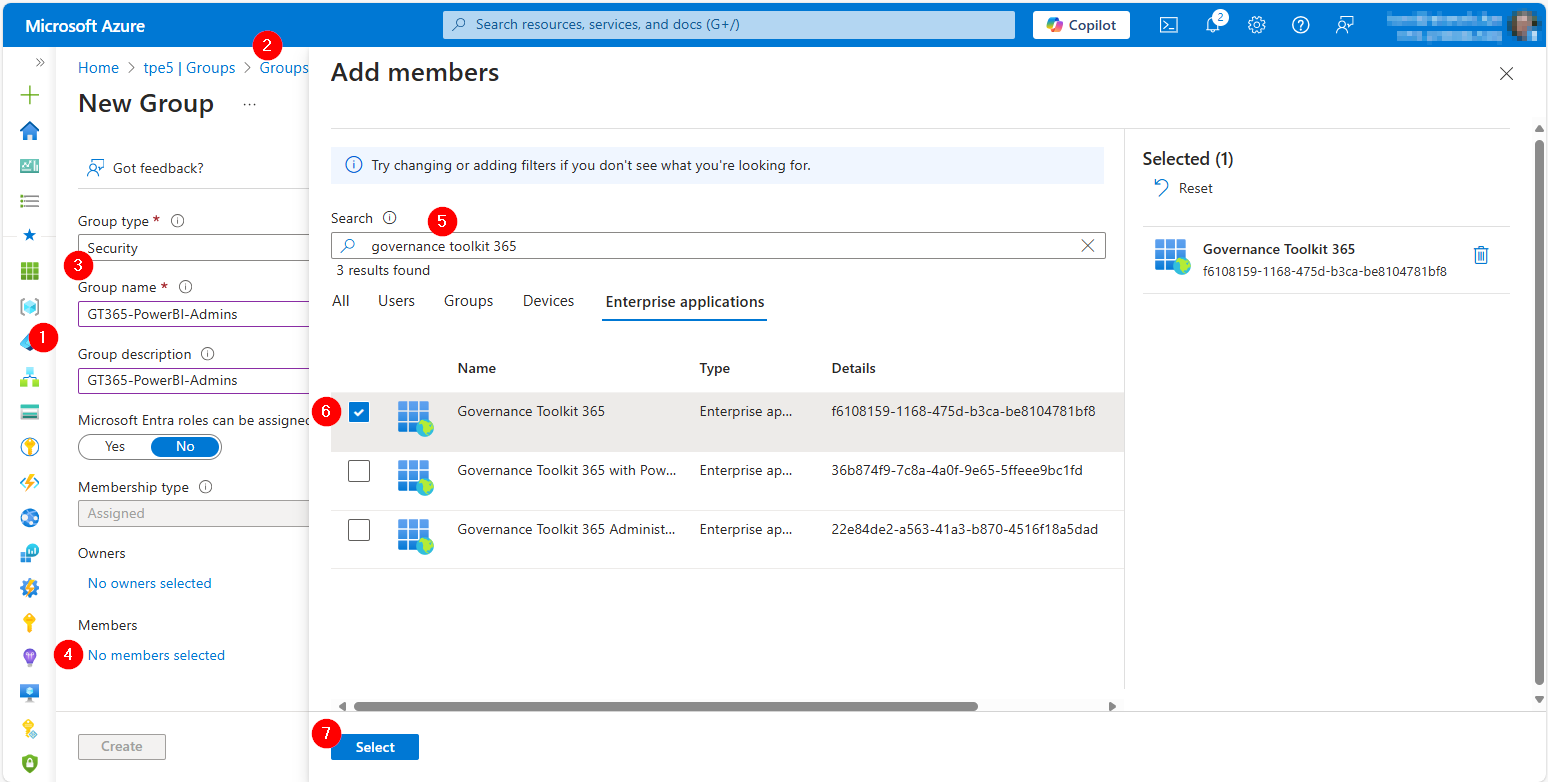
- Add owner: Add yourself as an owner to the group. Click on the Create button to create the security group.
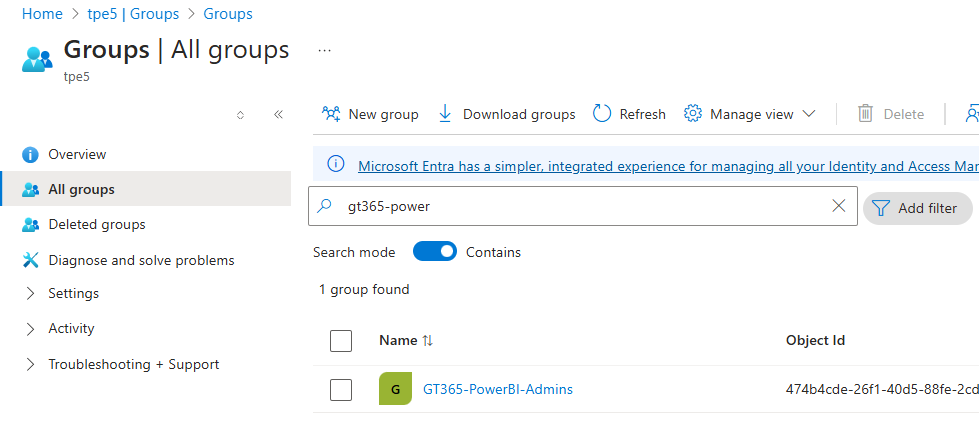
- Check the group: To check the new group, click Refresh. You should see the newly created group.
- Open the Power BI admin portal: We´re done in Azure portal. Now open the Power BI Admin portal at Microsoft Fabric Admin portal.
- Navigate to the Tenant settings: Open the Tenant settings section, and scroll down to the Admin API settings section.
- Enable the Admin API settings: Open the Service principals can access read-only admin APIs section, and set the Enabled switch to ON. Then, select your (new) security group “GT365-PowerBI-Admins”.
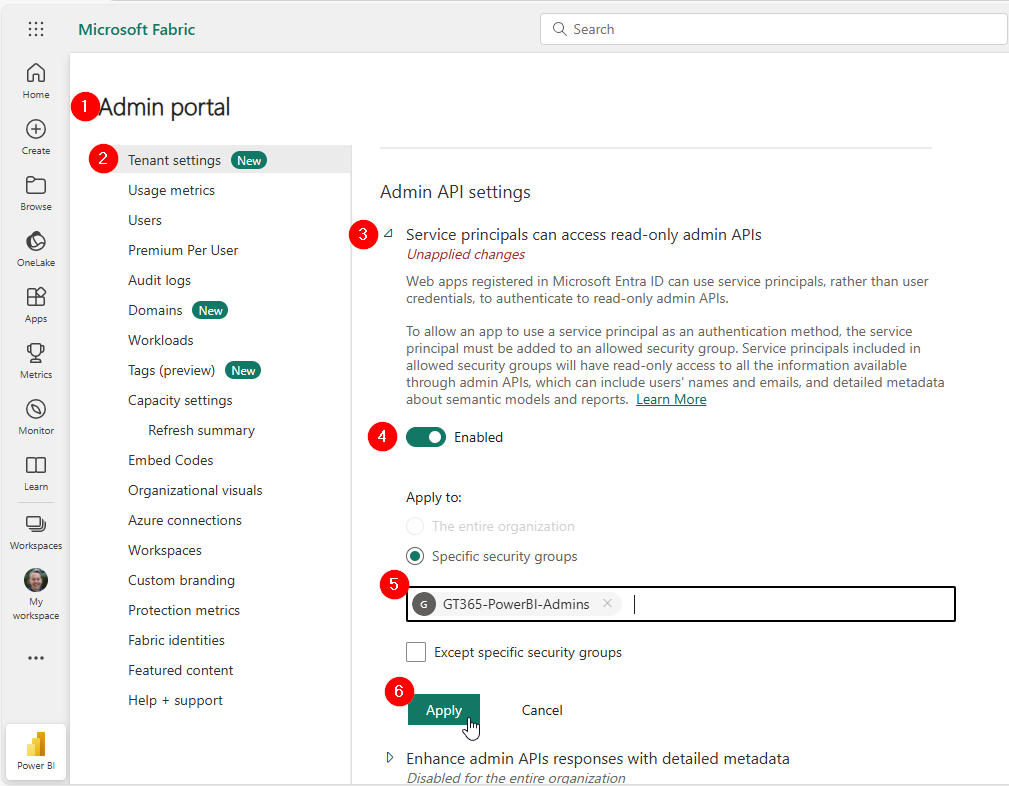
- When done, click Apply. Please note that this setting may take a few minutes to take effect, but this will not affect GT365 as it updates the data at night.
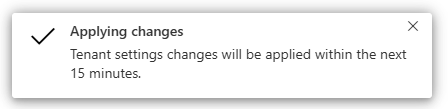




We’re done! The GT365 application receives read-only access to Power BI settings through its membership in the configured security group. GT365 will use this access method to collect and deliver Power BI data starting from the date shown above.
Step 5 - Configure Solutions and the GT365 API (Optional)
- GT365 solutions are ready-to-use, configurable business workflows for common Microsoft 365 administration and governance tasks, helping automate processes and improve operational efficiency. You can deploy solutions from the GT365 admin portal.
- The GT365 API provides secure access to perform specific actions in a Microsoft 365 tenant. To enable these actions, an additional application must be created and consented to by a Microsoft 365 administrator. See details at GT365 API.
Problems with Missing Data?
GT365 data is typically updated once per day. After completing the setup, new data should appear in GT365 and the Power BI reports within 24 hours.
If data is missing, check the following:
- Verify that all required permissions have been granted successfully.
- Ensure you are using the latest GT365 Power BI report template.
- Confirm that the relevant Microsoft 365 service is enabled and licensed in your tenant.
- If any of the permission or consent steps fail, repeat the entire process.
Once all required permissions have been granted, GT365 can collect and process data from the available Microsoft 365 services. The data will be visible in your GT365 storage account, reports, dashboards, and enabled solutions.
If you continue to experience issues or have any questions, please contact the atwork support team.
We hope GT365 helps simplify Microsoft 365 administration, governance, and compliance for your organization. If you are new to GT365, visit the Governance Toolkit 365 website and start a trial.