Delegate365 v9.1 provides basic management of SharePoint Online (SPO) sites that are assigned to an OU. See the prerequisites (part 1) and the features (part 2) here.
Part one - Create the SPO app once
Register the SPO app and to add that data in Delegate365. This needs to be done once by a Global Admin of the tenant.
- Important: Do the SPO app setup FIRST: To allow communication between Delegate365 and the SPO system, an app is required. Follow the steps described at Register SharePoint Add-ins to create the app or follow the step-by-step instructions here.
- AppRegNew: In a browser, as Global Admin, open the SPO Admin page and change your tenant name in the URL: https://<tenantname>-admin.sharepoint.com/_layouts/15/appregnew.aspx
- In the appregnew form, click Generate for the Client Id and click Generate for the Client Secret. Add an app title like "Delegate365SPOApp", your app domain like www.mycompany.org and a Redirect URI such as "https://www.mycompany.org /delegate365" as here. Click Create then.
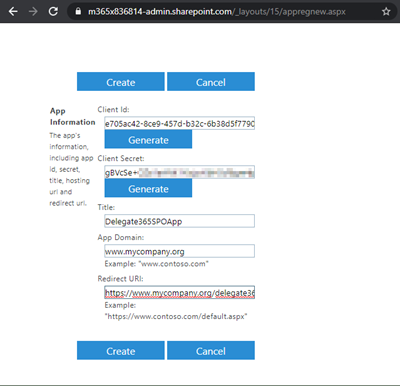
- The form will now show the data. Copy that data to a safe place - we need it later.
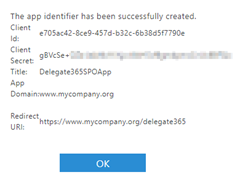
Click OK. You will be redirected to the settings page.
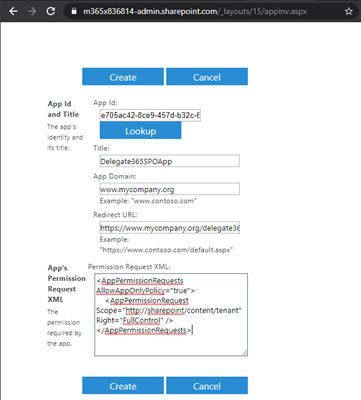
- AppInv: Use that browser page and change the page from settings.aspx to appinv.aspx - like here: https://<tenantname>-admin.sharepoint.com/_layouts/15/appinv.aspx
- In the appinv form, paste the Client ID into the App Id field and click Lookup. The app fields are now filled with your app data from the previous step. Add the permission XML from here:
<AppPermissionRequests AllowAppOnlyPolicy="true">
     <AppPermissionRequest Scope="http://sharepoint/content/tenant" Right="FullControl" />
 </AppPermissionRequests>
The, click Create.
- Trust the app: You will be redirected to the Trust page. Click Trust It.
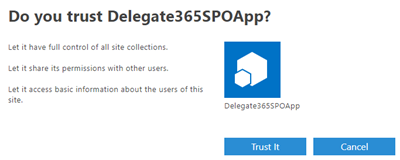
You get redirected to the SPO Admin center. You can now close this page.
- Back in Delegate365: Use that SPO app data and add it to Delegate365 in the Administration / Delegate365 settings. Go to the SharePoint configuration section and add the generated ClientId, the ClientSecret, and add the Tenant URL. Again, the tenant URL includes the name of your tenant in the admin-URL as here: https://<tenantname>-admin.sharepoint.com as here.
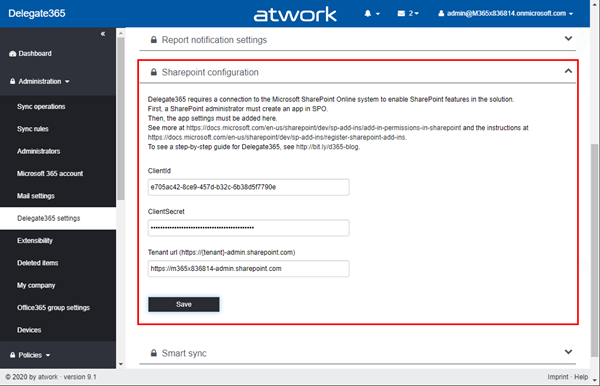
Click Save to proceed. This SPO app allows Delegate365 to access SharePoint Online. If this app registration is done, the following features are available.
- Note that it can take some minutes, until the new SPO app is functional and can be used from Delegate365.
Part two - Granting access using SharePoint App-Only (for newer tenants)
If the SPO communication does not work in Delegate365: Note that for new tenants, apps using an ACS app-only access token is disabled by default. Therefore you need to change the behavior by running the following PowerShell script to enable the SPO App Only authentication that is required by Delegate365. See more at Granting access using SharePoint App-Only. You need the latest SharePoint admin PowerShell (see here).
Install-Module -Name Microsoft.Online.SharePoint.PowerShell

Connect-SPOService -Url https://[yourtenant]-admin.sharepoint.com -credential admin@[yourtenant].onmicrosoft.com

Set-SPOTenant -DisableCustomAppAuthentication $false
That´s it. Then, the communication should work.
Part three - Manage SPO sites
After the configuration is completed, admins can use the features in Delegate365.
- SharePoint sites assignments: To manage SPO sites, admins can assign SPO sites in the OU´s / Assign menu. There´s an additional section for SharePoint. Toggle the section by clicking on the title.
![image_thumb[15] image_thumb[15]](http://blog.atwork.at/image.axd?picture=image_thumb[15]_thumb_2.png)
The sync gets all SPO sites if the tenant and allows to assign them to an OU here - as usual. The list shows all sites with their site type that are unassigned in Delegate365. Select the sites and assign them to the corresponding OU. Click the Assign button and confirm the popup message to do so.
![image_thumb[19] image_thumb[19]](http://blog.atwork.at/image.axd?picture=image_thumb[19]_thumb_2.png)
You can use the OU´s / Unassign menu to remove SPO sites from OU´s.
- Note: SPO sites don´t have a group membership and no properties in Azure AD. So, you can only assign sites manually to an OU as shown here. There´s no sync rule for automatic assignments available.
- SharePoint site and permission management: The new module SharePoint allows a basic management of the assigned SPO sites. The permission to see the menu SharePoint is controlled in the permission policies. The list shows the site name, the URL, the site type and the OU as follows.
![image_thumb[24] image_thumb[24]](http://blog.atwork.at/image.axd?picture=image_thumb[24]_thumb.png)
- Select a site to work with it: When you select a site and click Edit, you can modify specific site settings. The settings depend on the site type and show the most relevant site features.
![image_thumb[28] image_thumb[28]](http://blog.atwork.at/image.axd?picture=image_thumb[28]_thumb_2.png)
For example, the Sharing capability allows to control if and how sharing of content can be made in that site.
![image_thumb[32] image_thumb[32]](http://blog.atwork.at/image.axd?picture=image_thumb[32]_thumb_2.png)
A Team site allows more settings.
![image_thumb[36] image_thumb[36]](http://blog.atwork.at/image.axd?picture=image_thumb[36]_thumb.png)
Here, sharing can be specified.
![image_thumb[40] image_thumb[40]](http://blog.atwork.at/image.axd?picture=image_thumb[40]_thumb_2.png)
- Site features: The availability of features depend on the site type. If you change a site name, the URL remains. You cannot change the type of a site. To accomplish that, you would need to create a new site with the new site type. Delegate365 currently supports the new site types Communication site and Team only.
- Admins: To manage the Administrator of a site, open the Admins link. Select additional owners in the people picker and click Add. You can remove existing admins with the Remove "x" icon next to the name.
![image_thumb[44] image_thumb[44]](http://blog.atwork.at/image.axd?picture=image_thumb[44]_thumb.png)
- Permissions of users: To modify permissions to a site, select the site in the list and open the permission menu on the right.
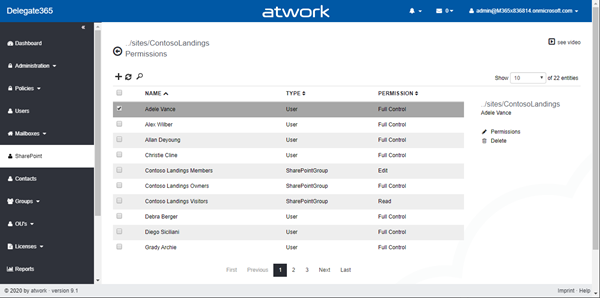
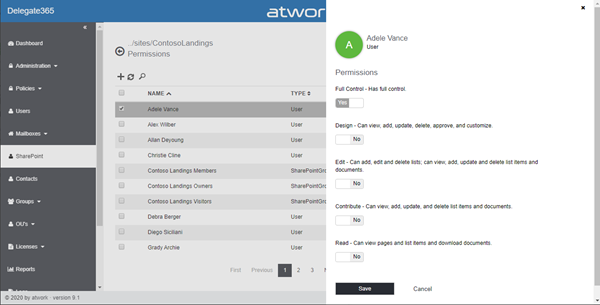
In the permissions list, select the user or group. Again, there´s a permissions menu on the right to change the site permissions for the selected object. The default permissions are: Full Control, Design, Edit, Contribute, and Read. If configured, custom permissions can show up as well.
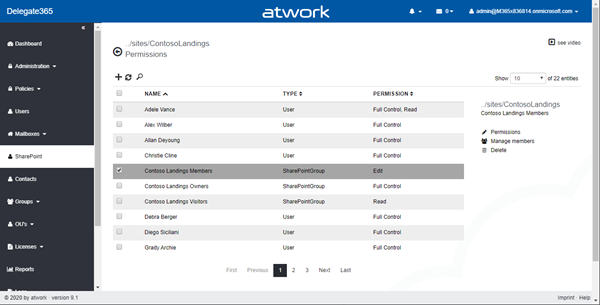
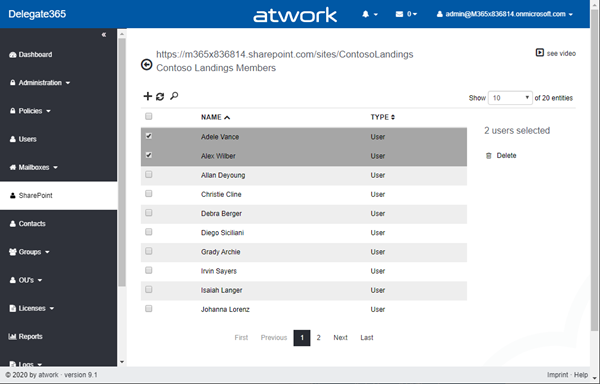
- Permissions of SharePoint groups: The same system works for groups with permissions, only additional members can be edited here. Manage members allows to do so.
Here, members can be removed…
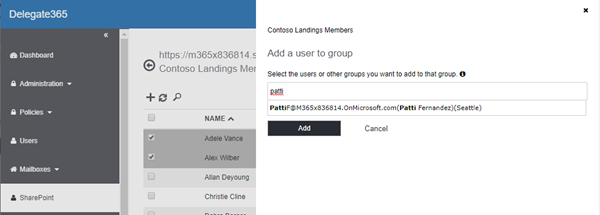
…and added.
Return to the permissions page with the left arrow symbol on top and at the end of the list.
- SharePoint Provisioning: Admins can create a new SPO site with Delegate365. As usual, this operation automatically assigns the new site to the selected OU. To create a new Team, follow the link saying "To provision a new Team or a new Microsoft 365 group, click here." below the panel title. Otherwise, use this panel to create a new Communication site as here.
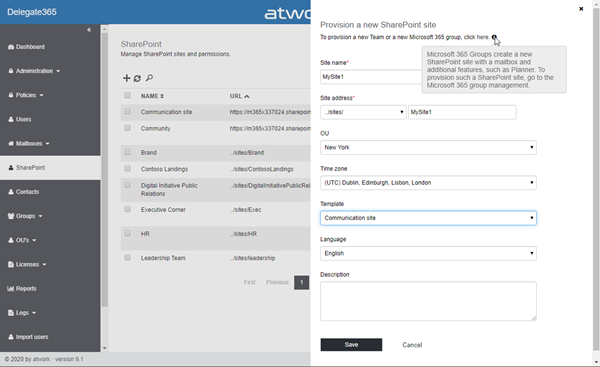
After filling out the site properties, click Save. This process can normally take between one and three minutes.

Note: Please do not close that panel and don´t navigate away (but you can open Delegate365 in another tab and continue to work there with other operations). In this case, the newly created site is not displayed. The new site will only show up after the next sync and after an admin has manually assigned the new site to an OU. So, it´s worth waiting until the process is completed. Once the site is provisioned it will be visible in the site list, and you can start configuring it.
- Default site permissions: a new SPO Communication site by default has the following permissions.
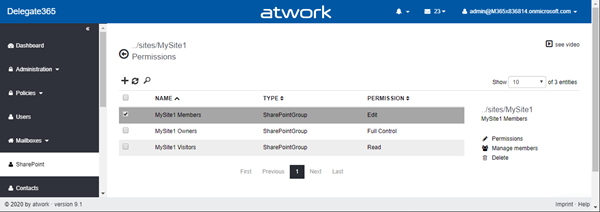
You can start to modify them as needed or add members to the predefined SPO groups.

Note: You can add users and security groups to a SPO site. In this sample, we add a security group sg-Finance.
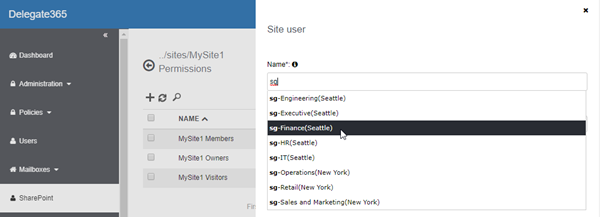
When creating, the permissions to that site can be set below.
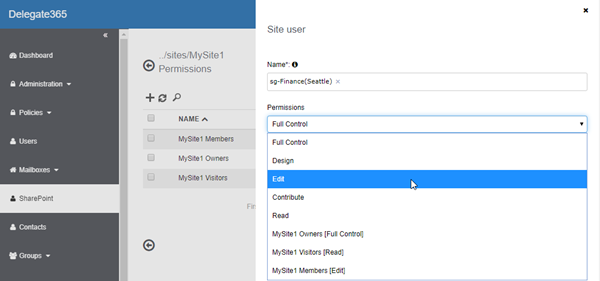
Click Create to add the user or the group with the defined permissions to that site. Modify the permissions as needed.
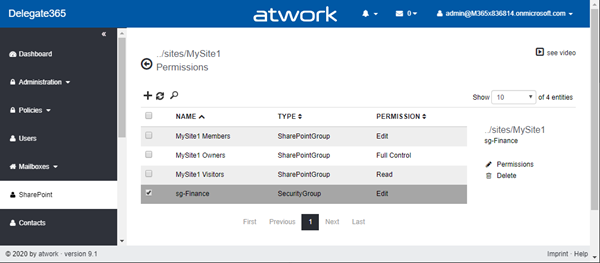
Return to the sites with the back icon on top and at the end of the page.
- Delete a site: To delete a site, select it and click the Delete option in the right menu. It will be deleted and is no longer accessible.
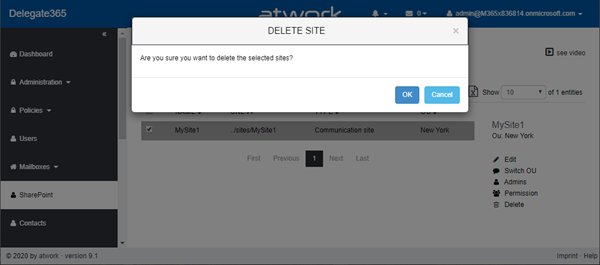
- Note: Deleted SPO sites are "soft deleted" and can be restored within 30 days by a SPO Admin in the SPO Admin center at https://<tenantname>-admin.sharepoint.com/_layouts/15/online/AdminHome.aspx#/recycleBin. Also, a site can be "hard deleted" in the SPO admin center.
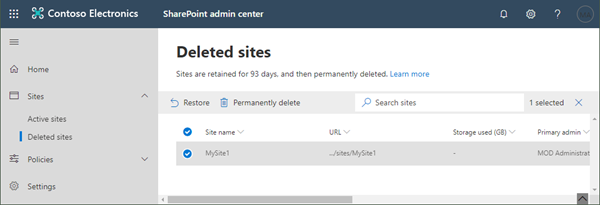
If a site is restored, Delegate365 will see that site after the next sync operation. To make the site visible, it must be assigned to an OU again as described above.
Managing assigned SPO sites in Delegate365 allows scope admins to provision and to manage specific sites within the management solution and within their environment. We think this is a useful addition for Delegate365. Portal admins can control if their scope admins shall be entitled to use this feature in the permission policies.