PowerApps provide a good solution for small apps. They run on a device and connect to an online data source. But what happens if no data connection is available, for instance in a building? Well, you can develop a PowerApp that works offline and synchronizes local data to the data source when you're back online. See how this works here!
A basic demo app
To show the basic functionality, I developed the following, colorful demo PowerApp. The app consists of one screen in tablet mode including a connection toggle control, two input fields for a name and an email address, two data tables and some buttons. The goal is to read and write data in offline and online mode.
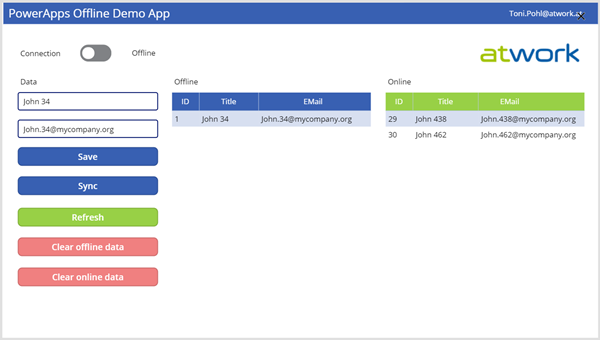
The left (blue) list shows local data, the right (green) list shows data of a connected data source. To be more specific, the blue data table is bound to a collection named CollectionOffline, the green table is bound to a SharePoint list named ContactList. More about that later.
My Data Source
My online data source is a Custom List named ContactList in SharePoint Online (https://mycompany.sharepoint.com/sites/Demo/Lists/ContactList/AllItems.aspx), which has just two columns: Title and EMail.
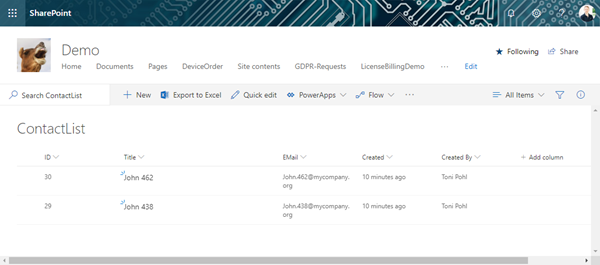
Currently, there are two records stored in that list.
Develop the app
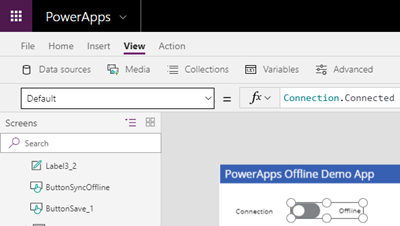
First, I created a new (blank) PowerApp and added some controls as shown in the screen above. To see the connection status and to play around, the first control is a connection toggle. In the Default property, I added Connection.Connected. This shows the status and also allows to manually switch between online and offline mode.
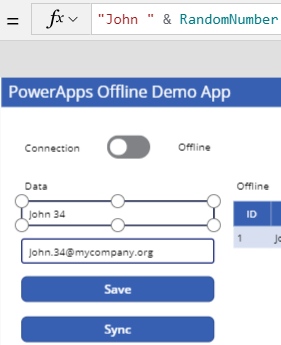
Below, on the left side, I added the controls as shown above. To keep testing easy, I wanted some randomly generated data when clicking the Save button. So, I used "John " and a variable RandomNumber: "John " & RandomNumber. The same goes for The EMail Default text: Substitute(TextName.Text," ",".") & "@mycompany.org"
The Save button
The RandomNumber variable is set in the Save button OnSelect event:
Set(RandomNumber,RoundDown(Rand()*1000,0))
Each time, the Save button is clicked, the both fields get a random name and email address. This saves time for testing, no manual input is required for different data. But we´re not done. First, we implement the "offline" functionality by using a collection to store our values temporary. So, the following code is added after the Set() command, don´t forget the first semicolon:
; Collect(CollectionOffline,{id:Max(CollectionOffline,id)+1,Title1:TextName.Text,EMail1:TextEMail.Text});
 Notify("Record temporary saved.")
The collection is named CollectionOffline and a generated ID and the text values of the input-controls TextName and TextEMail (pls. use your own control names as Inputtext1, etc.) are added to that collection. Then, a notification is shown. Now, you should run the app and click the Save button multiple times to generate data in that collection. You can check the values in the Files / Collections menu.
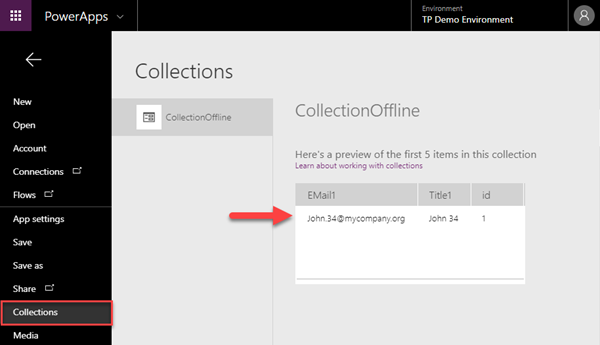
When done, let´s continue with the lists.
List bindings
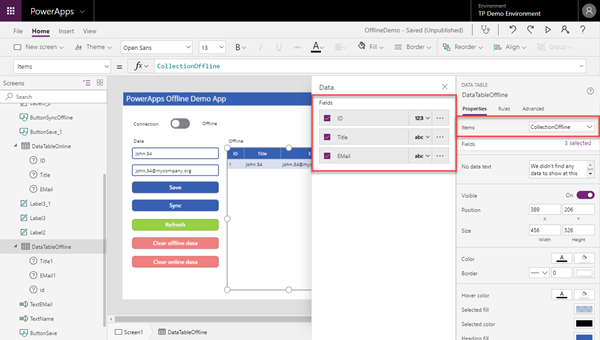
The blue list should display our "offline" data: Data that is entered when offline. So, our CollectionOffline object as Items property and select all three fields. The blue list now shows our generated data - that´s our offline scenario.
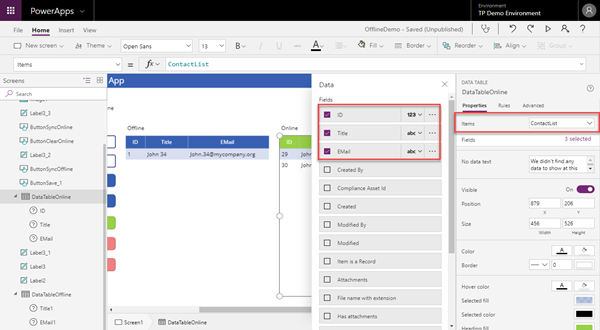
The green list is bound to the SharePoint list ContactList in PowerApps, as shown here. Select the relevant fields of that list here as well.
The final save logic
Almost there! Now, let´s complete the Save button logic. See the formatted value in this screenshot:
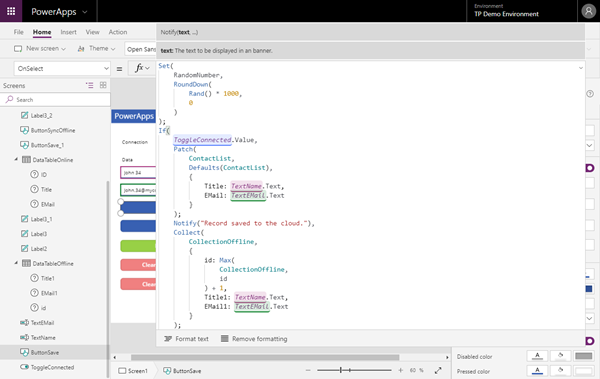
Here´s the not so well formatted, but shorter code sample:
Set(RandomNumber,RoundDown(Rand()*1000,0));
If(ToggleConnected.Value,
 Patch(ContactList,Defaults(ContactList),{Title:TextName.Text,EMail:TextEMail.Text});
 Notify("Record saved to the cloud."),
 Collect(CollectionOffline,{id:Max(CollectionOffline,id)+1,Title1:TextName.Text,EMail1:TextEMail.Text});
 Notify("Record temporary saved."))
If the toggle is connected, we add the text input controls data with a Patch() command to the ContactList. The green list then shows all new items. If not connected, we add the text input controls with the Collect() command to the CollectionOffline list. The blue list then shows that data.
Test it
Our app should work dependent on the toggle switch. You can add items. When clicking Save, the new item is added to the blue (offline) or to the green (online) list.
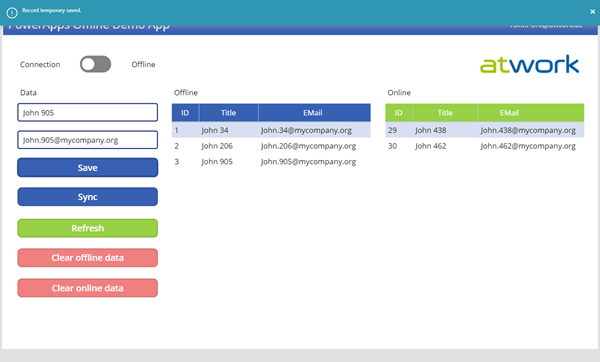
In this sample, I switched the Connection toggle to Offline and added two more contacts - they show up in the blue list.
Add sync functionality
So, how do we get the records into our online data source, when back online? I added a button Sync to do that.Actually, it´s easy: All items of the blue list must be added to the green list. This can be accomplished as here.
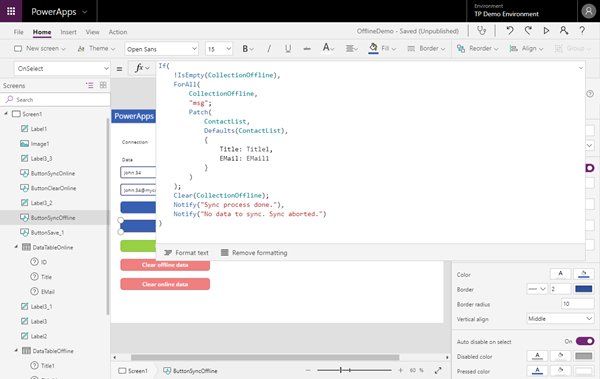
If CollectionOffline contains items, we run through all items and add them - with the same method as in the Save button - to the ContactList. This is the code:
If(!IsEmpty(CollectionOffline),
 ForAll(CollectionOffline,Patch(ContactList,Defaults(ContactList),{Title:Title1,EMail:EMail1}));
 Clear(CollectionOffline);Notify("Sync process done."),
 Notify("No data to sync. Sync aborted."))
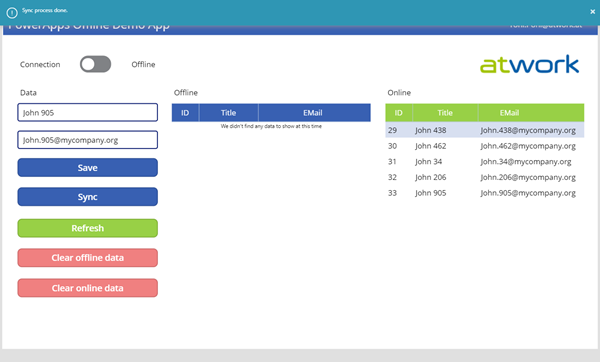
When Sync is clicked, all items should be synced through the (SharePoint) data connector and are "moved" from the blue to the green list.
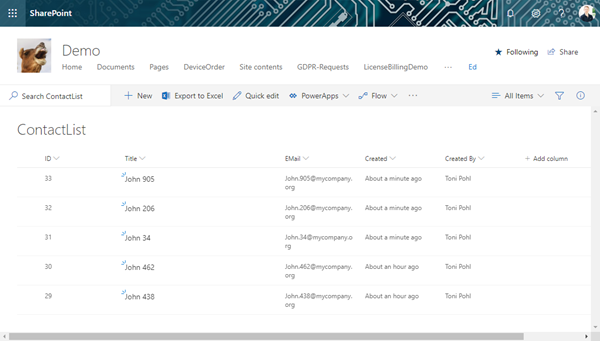
Checking in SharePoint Online: All items are visible.
Add some helper buttons and an action in OnSelect
To Refresh the green list:
Refresh(ContactList);
Notify("Online data source refreshed.")
To clear the blue list (our collection):
Clear(CollectionOffline)
To clear the the green list (the data source):
RemoveIf(ContactList,true);Notify("All records have been deleted in the online data source")
More resources
I found useful online resources with a very similar approach by other community members at No Internet? No Problem! [PowerApps] by Mr.Dang and at PowerApps - offline support demo by Chris O'Brien. Check them out!
Summary
This sample shows step-by-step how to develop a PowerApp with offline functionality, in this case just for adding new data. The key here is to use a custom Collection to store temporary data and to "synchronize" that data when online.
Keep in mind to make the app as simple as possible for the users. The Connectivity toggle helps and have ONE Save button to save data. Of course, Save and Sync could be integrated, depending how transparent you want to shape the app. Also, keep in mind the limitations of Powerapps and see the Common issues and resolutions for PowerApps.
I hope you find this article useful. Have fun playing with PowerApps!